Brewing a DIPA: Moving from extract to all-grain Home brewing
Back in my retrospective on 2020 I mentioned that I’d picked up brewing beer as a pandemic hobby.
There are three main methods of brewing you see homebrewers in the UK doing. The first uses the beer-in-a-can kits that you can buy in home hardware stores in the UK: you get basically concentrated beer extract that you dilute down to the required concentration and ferment. These may or may not have extra hops added into the fermenter depending on the kit.
The second is extract brewing. You start with a simple pale ale malt extract. The brewer can then use speciality grains, which are steeped like a tea in the diluted extract to create sweet wort. The sweet wort is then boiled with hops to add bitterness and more flavour to create wort, which is then fermented.
The last way is all grain brewing: Instead of using malt extract, the brewer starts by crushing the grains, and then steeping them in hot water to activate the enzymes required to break the starches down into sugars in a process known as mashing. Then the rest the process is the same as extract brewing. The wort is boiled with hops, and then fermented.
This is proper brewing: (mostly) the way that beer has been made since the Sumerians carved the oldest known surviving beer recipe on stone tablets in 3900 BC1.
I am the sort of person who likes processes and control (God that makes me sound like an arse) and for this reason I always wanted to do all-grain brewing. Having complete control over the whole beer making process with as few shortcuts as possible was always my main goal.
That being said. I also didn’t want to invest in all the kit required to do all-grain without knowing if I was even going to enjoy making beer rather than just drinking it!
In 2020, I was gifted a small batch extract kit for my birthday, which was perfect. It was just enough equipment to get started with the extract process, made a small amount of beer and allowed me to give the process a try without too much investment.
I ended up doing 3 batches of ~4L each and I was hooked. I started to upgrade my equipment piece by piece, first was the fermenter - I got a plastic 12L Spiedel fermenter which allowed me to make a bigger batch using a partial boil process, then I got hold of a bigger 19L stock pot, so I could do full boils (and stop using the family pasta pot to make beer in).
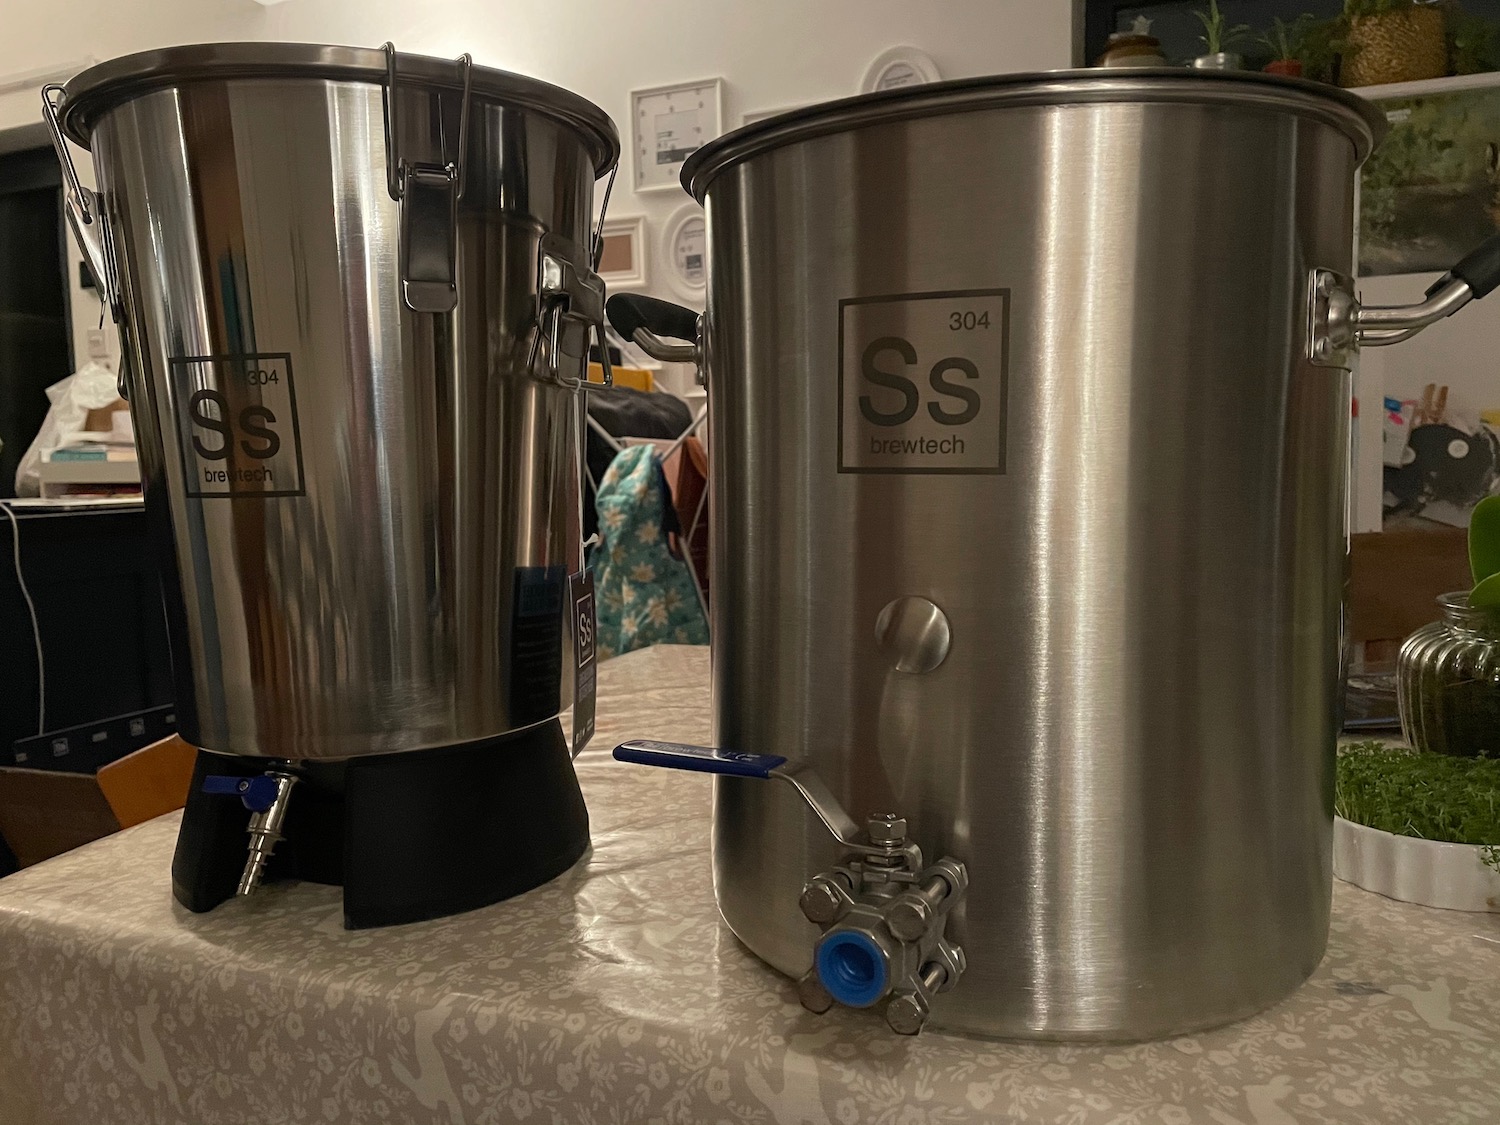
Finally, in the 2020 Back Friday Sales, I snagged a 20L SS Brewtech kettle, and the matching 13L SS Brewtech stainless fermenter with a decent discount. I vowed that with my new shiny equipment I was finally going to start brewing all-grain.
But be warned: I have no idea what I’m doing.
The Recipe
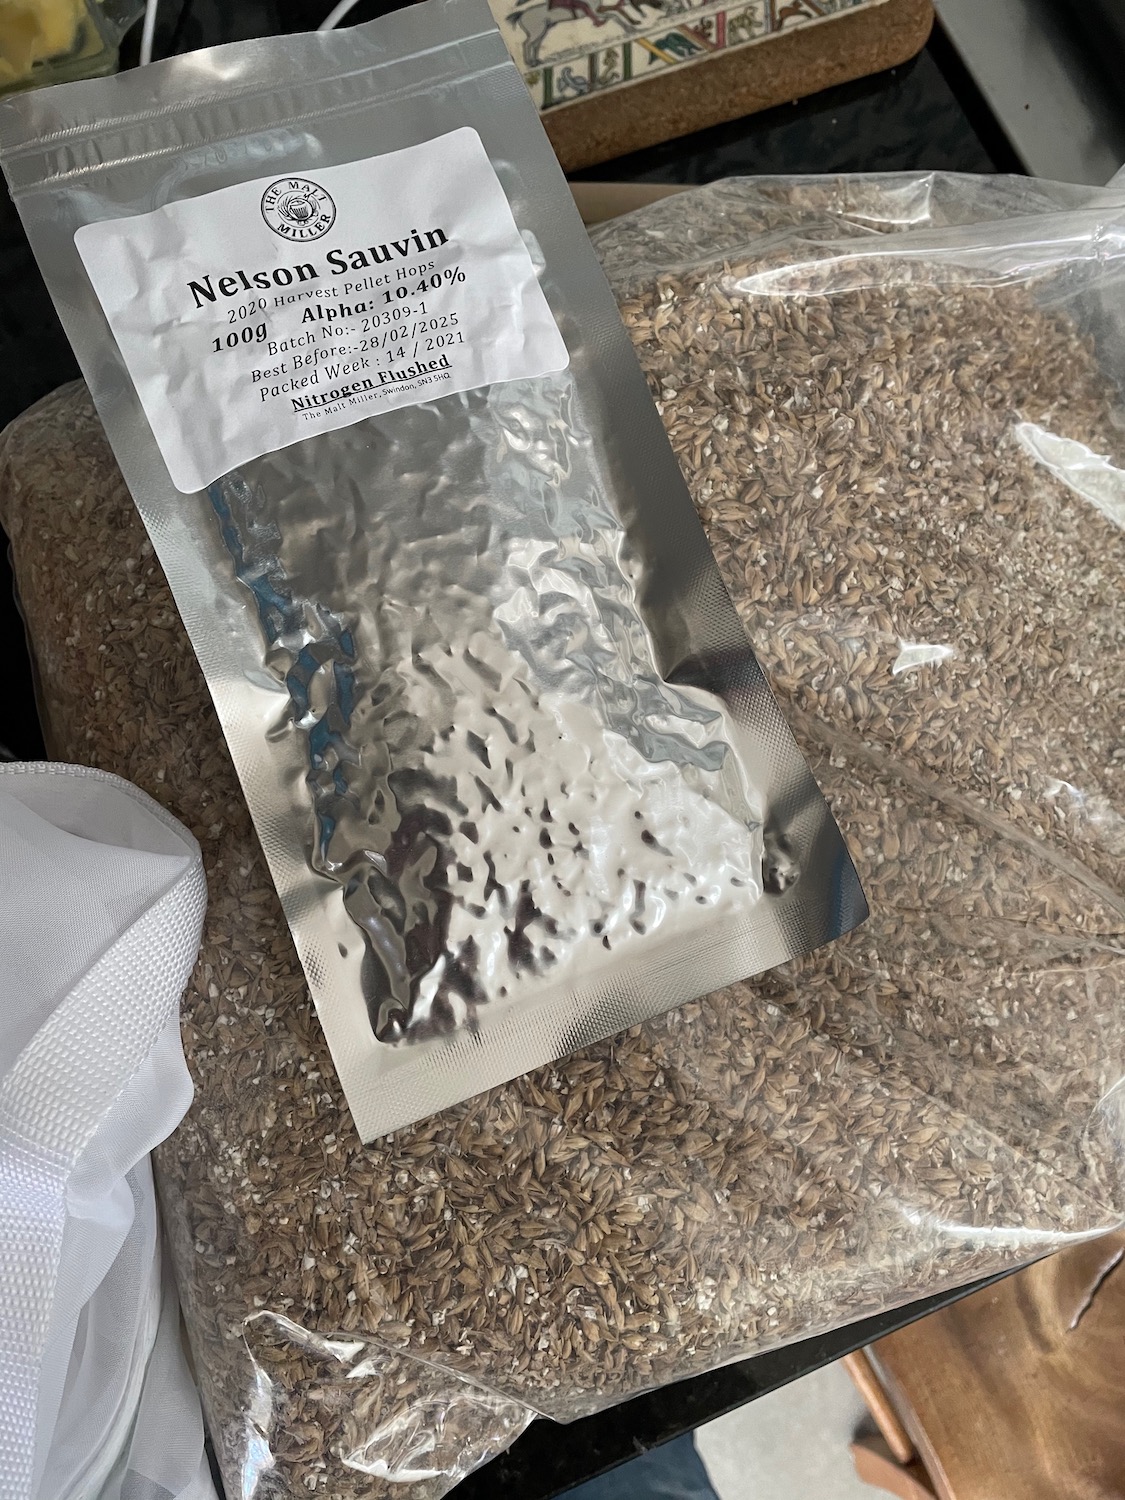
I wanted to start simple because I have never done a mash before, and the science behind enzyme activation and sugar extraction is intimidating. My grist is comprised of a single pale ale malt - Thomas Fawcett Golden Promise. I mostly just picked a pale malt at random, there are so many to choose from and without much experience of this stage of the brewing process it was all new to me. I do know that I like a lot of beers with Golden Promise as the base so that was good enough for this time.
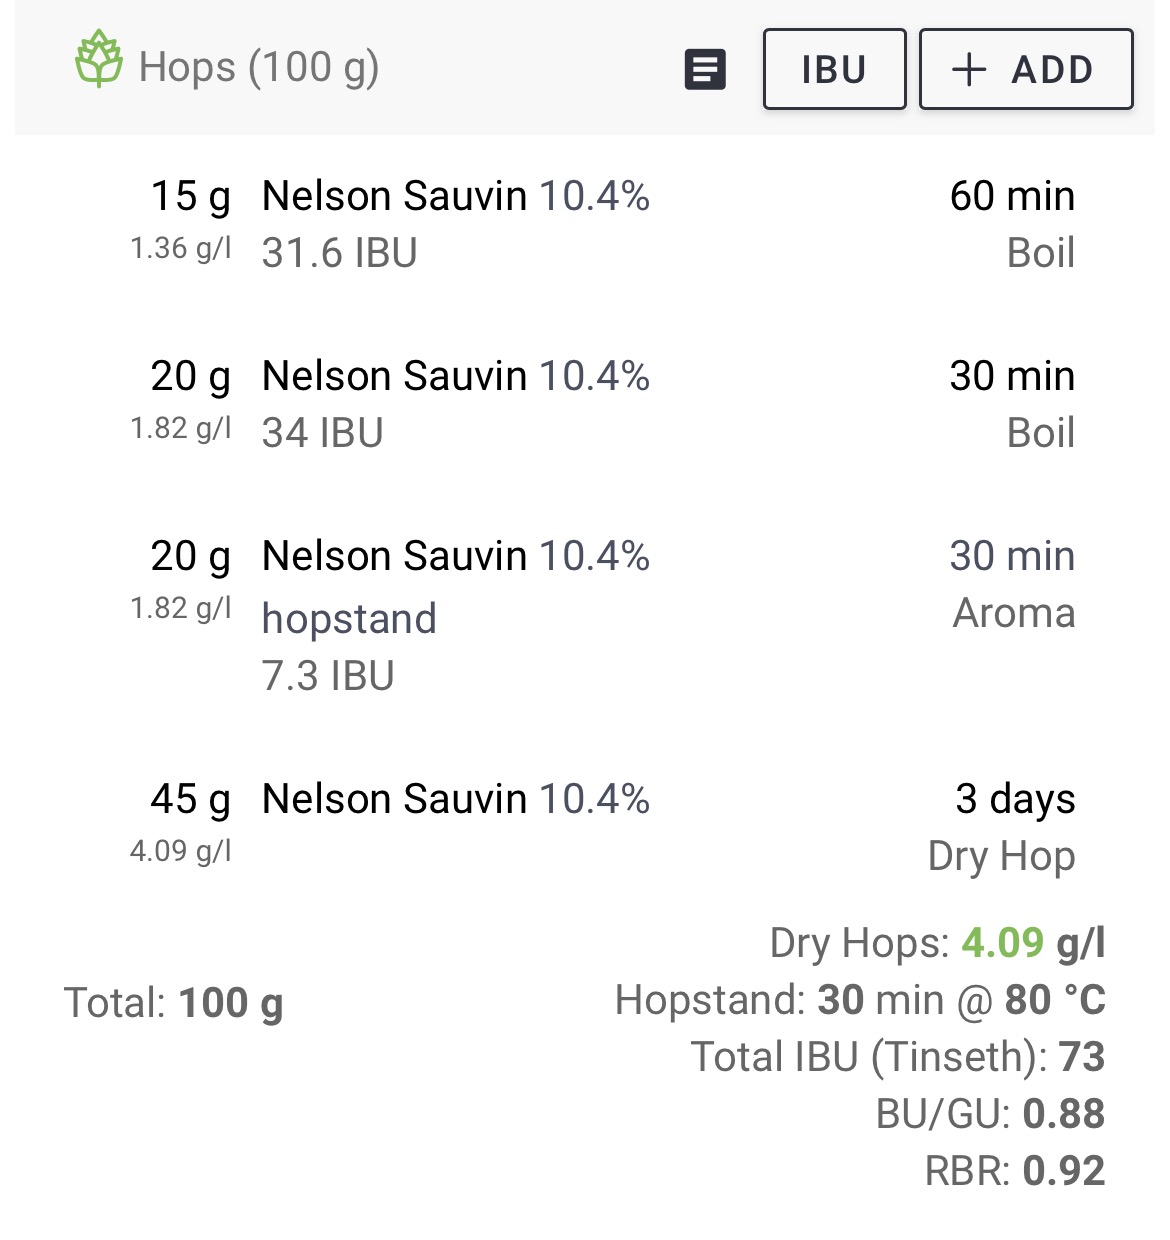
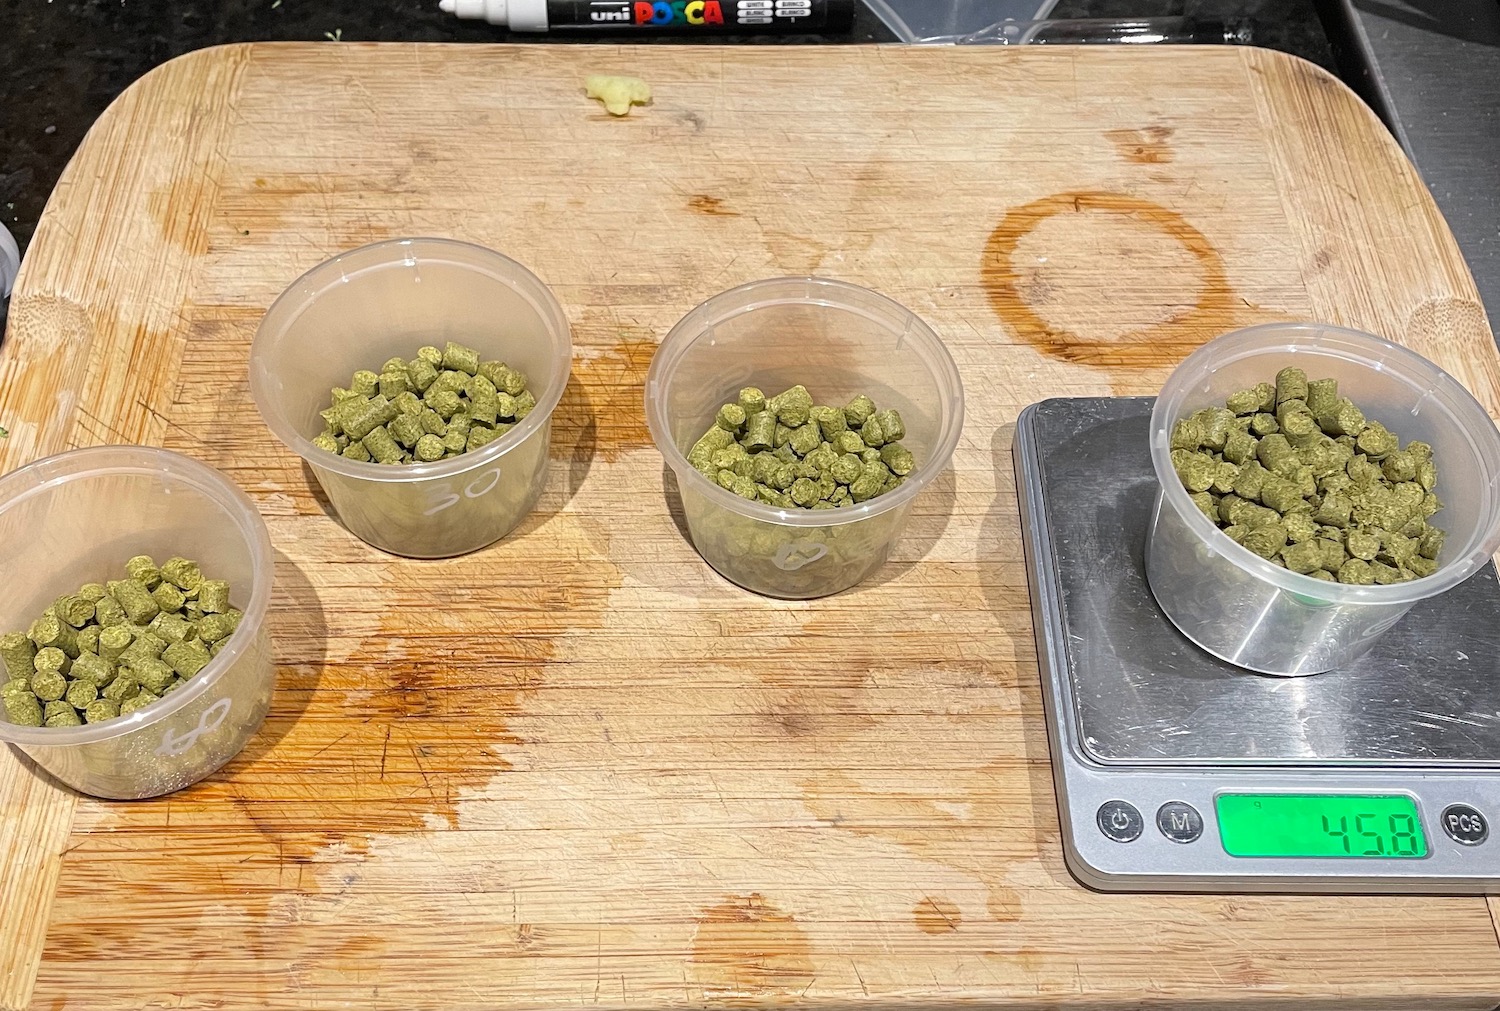
Next up was the choice of hops. It’s pretty typical to choose different types of hop, some high alpha acid varieties for bittering, and then different hops for flavour and aroma, to be used at different times during the boil. I chose to keep it simple and just use one type of hop throughout, because I want to start training my palette to identify the different characteristics that each hop could add to the brew.
This time it’s some Nelson Sauvin I picked up on a whim from the online homebrew store I use. I had originally planned to use some Azacca I already had, but these came through with a small hole in the packaging, which meant the vacuum seal wasn’t holding so I had to use them first.
This kind of beer is known as a SMASH beer: Single Malt And Single Hop. It’s a pretty common way of brewing when you want to test variations to a recipe: You can vary your base malt and the differences won’t be overpowered by darker speciality malts as they might be in other recipes. You can also really focus on the characteristics of your hop choice against a familiar known base.
Brewing this multiple times and changing one variable each time is how I intend to start training myself to identify what impact each component has on the finished beer.
Because I want to focus on the flavours of the malt and the hops I chose to use a yeast that I’m pretty familiar with, and conveniently, one that’s well known for being “clean”, or imparting few characteristics of its own to a brew: Safale US-05 dried american ale yeast.
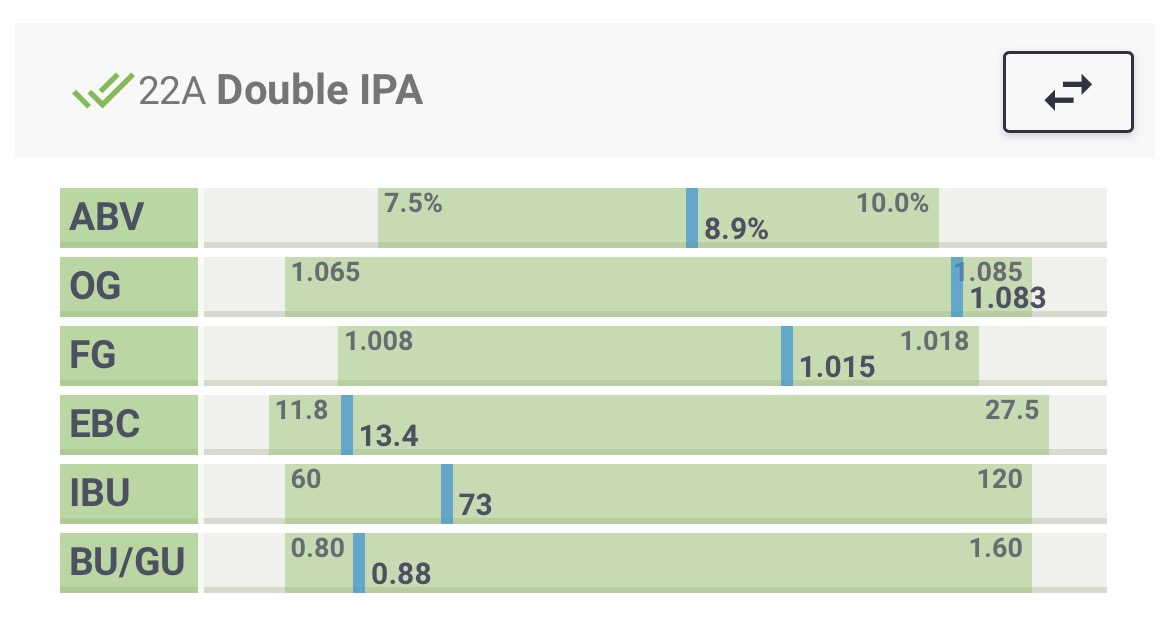
So with my ingredients chosen, I just had to work out how to combine them! After some tweaking, I settled on a recipe that looks a little like a double IPA: Using 4kg of Golden Promise for a pale straw coloured beer, at about 9%. Quite hoppy, with an IBU of 73, dry hopped with just over 4 g/L.
Here’s how it stacks up against the BJCP 2015 style guidelines for an Imperial IPA:
The Process
The traditional all-grain process goes something like this:
-
First you collect your liquor (water), and heat it to strike temperature, this is a few degrees above your desired mash temperature to allow for cooling when the grain is added.
-
Then you add your liquor to the mash tun, and pour in the grist (crushed grains) to create a porridge like mixture, stirring continuously to ensure you avoid dough balls. This is called mashing in.
-
Then you insulate the mash tun and leave it for an hour or more so the enzymes in the grain can activate and start converting starches in the grain into sugar, this is the mash.
-
Once the mash has finished you need to drain the sweet wort away from the spent grain (lautering), you can also rinse the grain bed with hot water to collect any residual sugar (sparging).
-
The boil is next. Wort is boiled for 60-90 minutes, with hops added at various times. Bittering hops go in at the start of the boil so their alpha acids can be isomerised into iso-alpha acids, the chemical that makes beer bitter. Flavour and aroma hops are added nearer the end of the boil so less of the volatile flavour compounds boil away.
-
Now that the boil is over we need to chill the wort down rapidly to around 25-30°C and transfer it to our fermentation vessel. When it’s cool and in the fermenter we can add the yeast (pitching). This is the point where sanitisation becomes key. As soon as the wort is off the boil, the risk of contamination rises. This means wild yeast and other kinds of bacteria can infect your beer. In the best case you might end up with an awesome sour, in the worst case your wort is going down the drain. Either way you won’t end up with the beer you set out to make.
-
Once the yeast has been pitched, the beer is kept at a reasonably constant temperature for the yeast to ferment the sugars into alcohol. This is the leave it the heck alone stage!
So now that you know all the steps involved to brew a beer using an all-grain process. I can tell you that this is not the process I used! Technically the process I used is called an all-grain single-vessel, no-sparge no-chill process. From what we’ve seen so far you should know what that means right?
Just kidding.
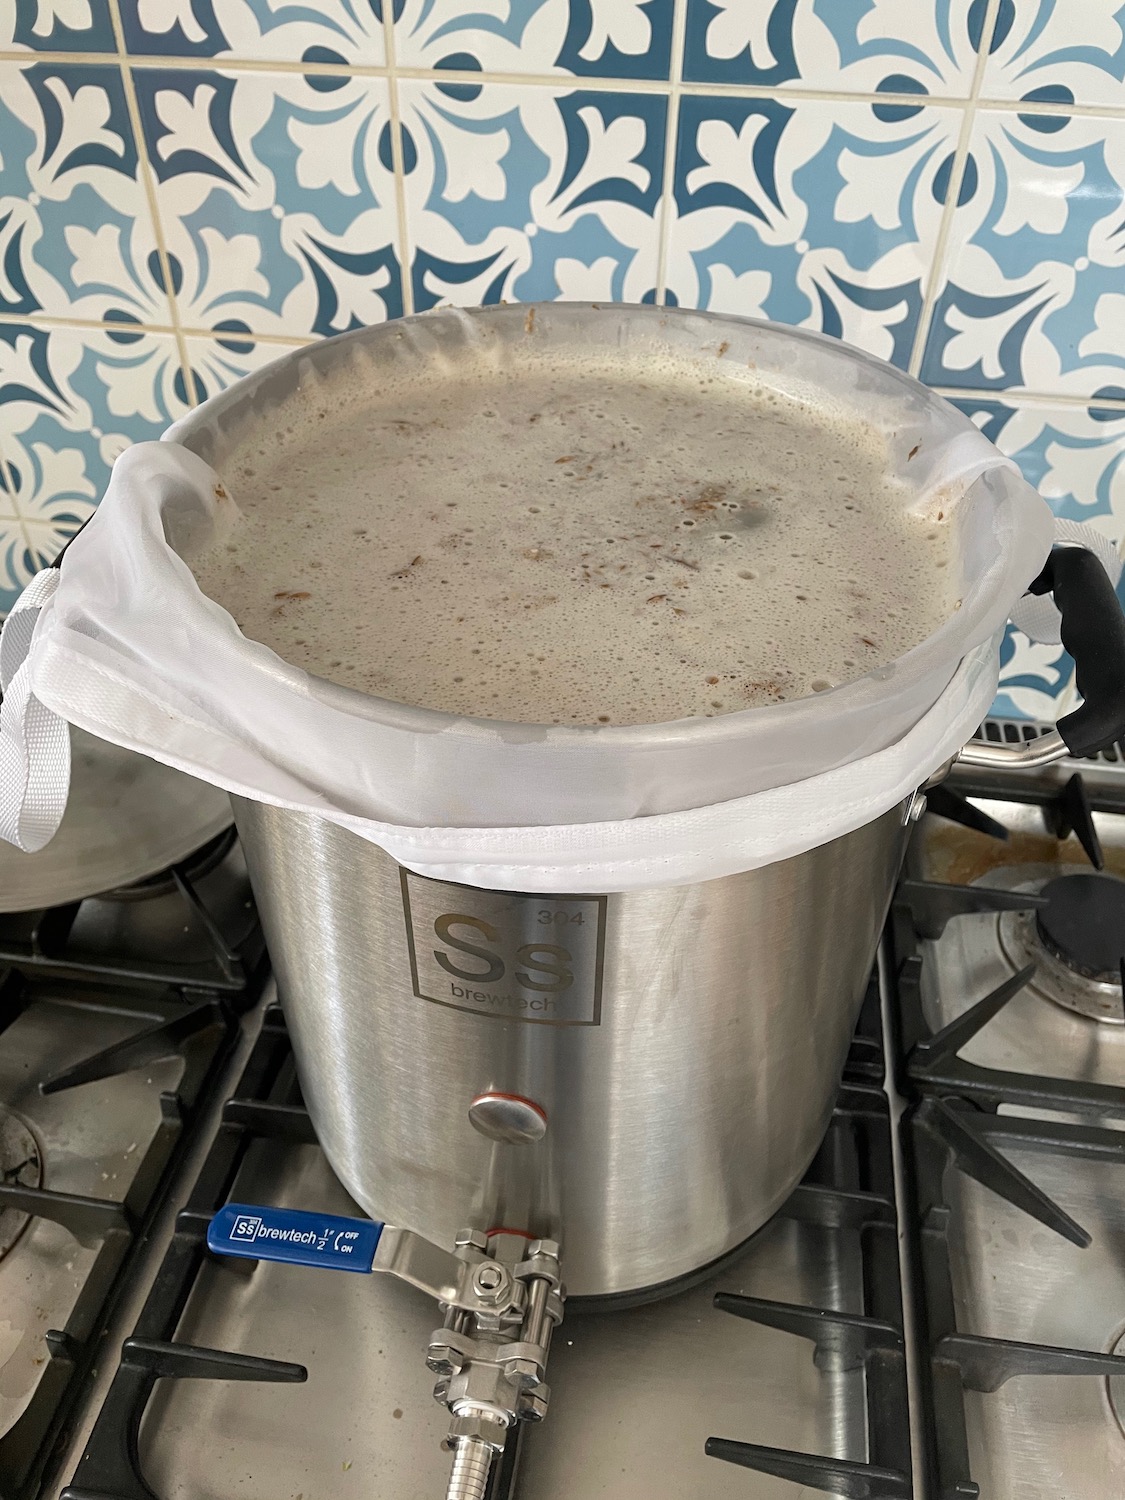
The process I used is normally called brew-in-a-bag (BIAB). this means that instead of mashing in a mash tun and then lautering (and sparging) into a boil kettle. I mash directly inside my brewing kettle using a large nylon bag to hold the grains. A lot like a massive tea bag.
Instead of lautering I just needed to lift the bag containing the grain out of the kettle, and let it drain for a while, leaving the sweet wort behind in the kettle ready for the boil.
The no-chill part is a technique popularised by Australian homebrewers, where summer droughts and water shortages mean it’s often not possible to use the 100+ litres of water required to chill the wort down with an immersion chiller. It basicaly just involves shoving the hot wort straight off the boil into a sealed container, often a HDPE water container known as a cube, and letting it cool down to pitching temperature naturally over a day or two. Because the wort is transferred hot into the cube and then sealed so that it’s air tight, the heat sterilises the container and ensures that the wort cannot spoil while it’s cooling.
Brew day
Brew day for me was a three part affair spread over the weekend. I mashed on a saturday morning, while the kids were around. It turns out helping daddy make beer is a good way of tempting a 3 year old away from the TV.
Part 1: Saturday morning. The Mash
First I collected 17 litres of water, and heated it to 68°C.
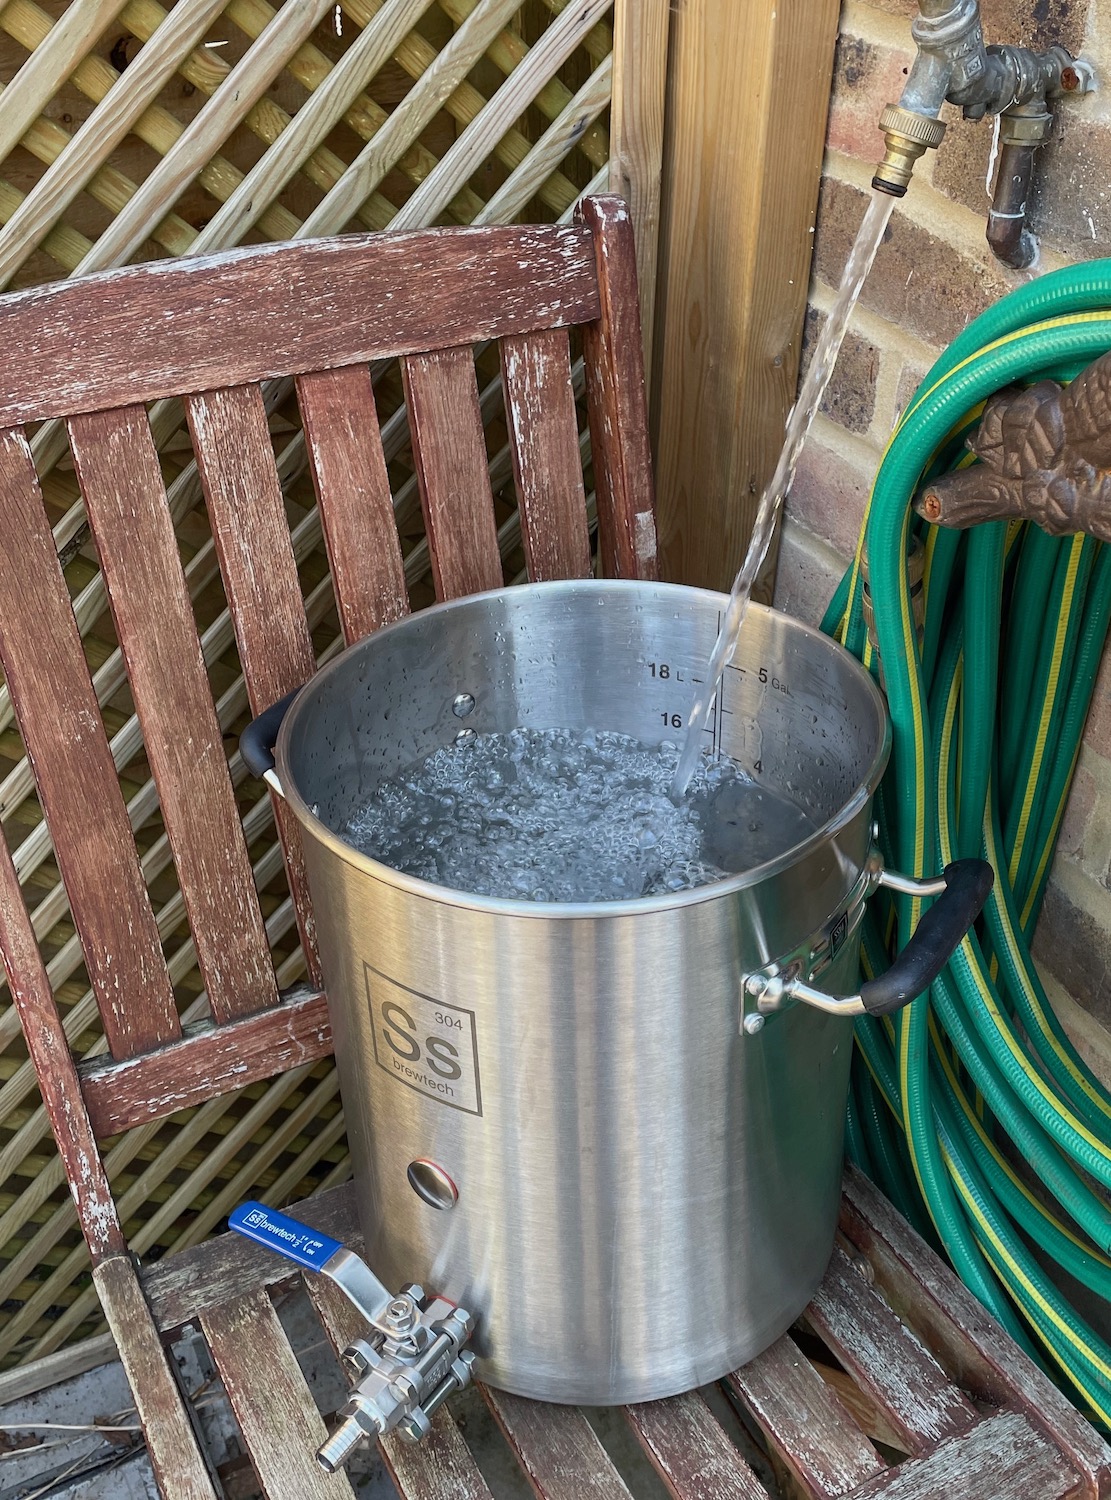
Then I added my grains in the grain bag and stirred them in. I was aiming for a mash temperature of 65°C - I’m not going to explain why because I’d be basically just cargo culting some science I don’t fully understand yet, but I was hoping for a good balance between the body of the final beer and the fermentability.
What I hadn’t anticipated was the difficulty I would have holding on to 4Kg’s of grain in one hand, and attempting to pour it slowly and uniformly into the kettle whilst stirring with the other hand. I spent so long teasing out dough balls that my temperature dropped to ~62°C.
I was planning on borrowing a technique from an Australian homebrewer who’s Youtube channel I subscribe to, and put the pot in the oven at a really low temperature to keep it stable for the duration of the mash. So to try and compensate for some of the temperature drop I turned the oven up a bit higher than normal. This sort of worked I ended up mashing for two hours, and the temperature hit 64°C about 45 minutes in and held for the rest of the time.
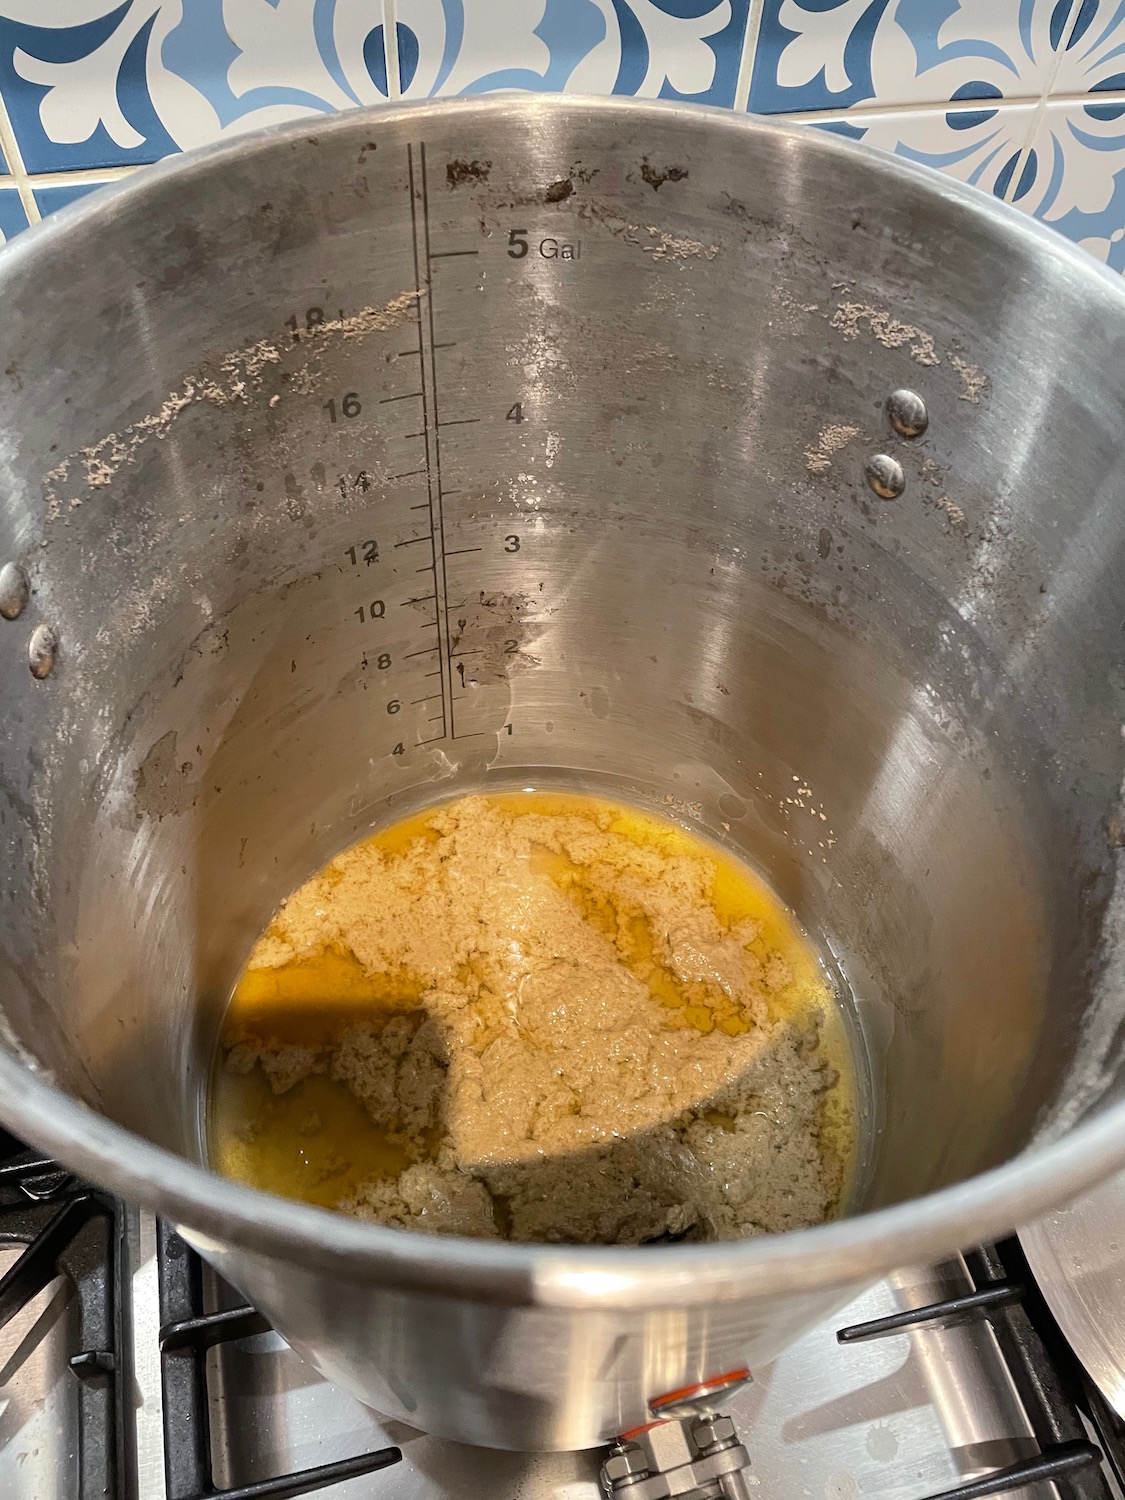
While my grains were mashing I mowed the lawn and did some other things, and then came back to drain the wort. Lifiting the bag was harder than I anticipated, partly because my oven temperature shenanigans had resulting in me melting one of the handles off of my grain bag, which I now need to fix or replace before my next brew, and partly just because a bag that contained 4Kg of grain that had been soaking in hot water for 2 hours is pretty damn heavy.
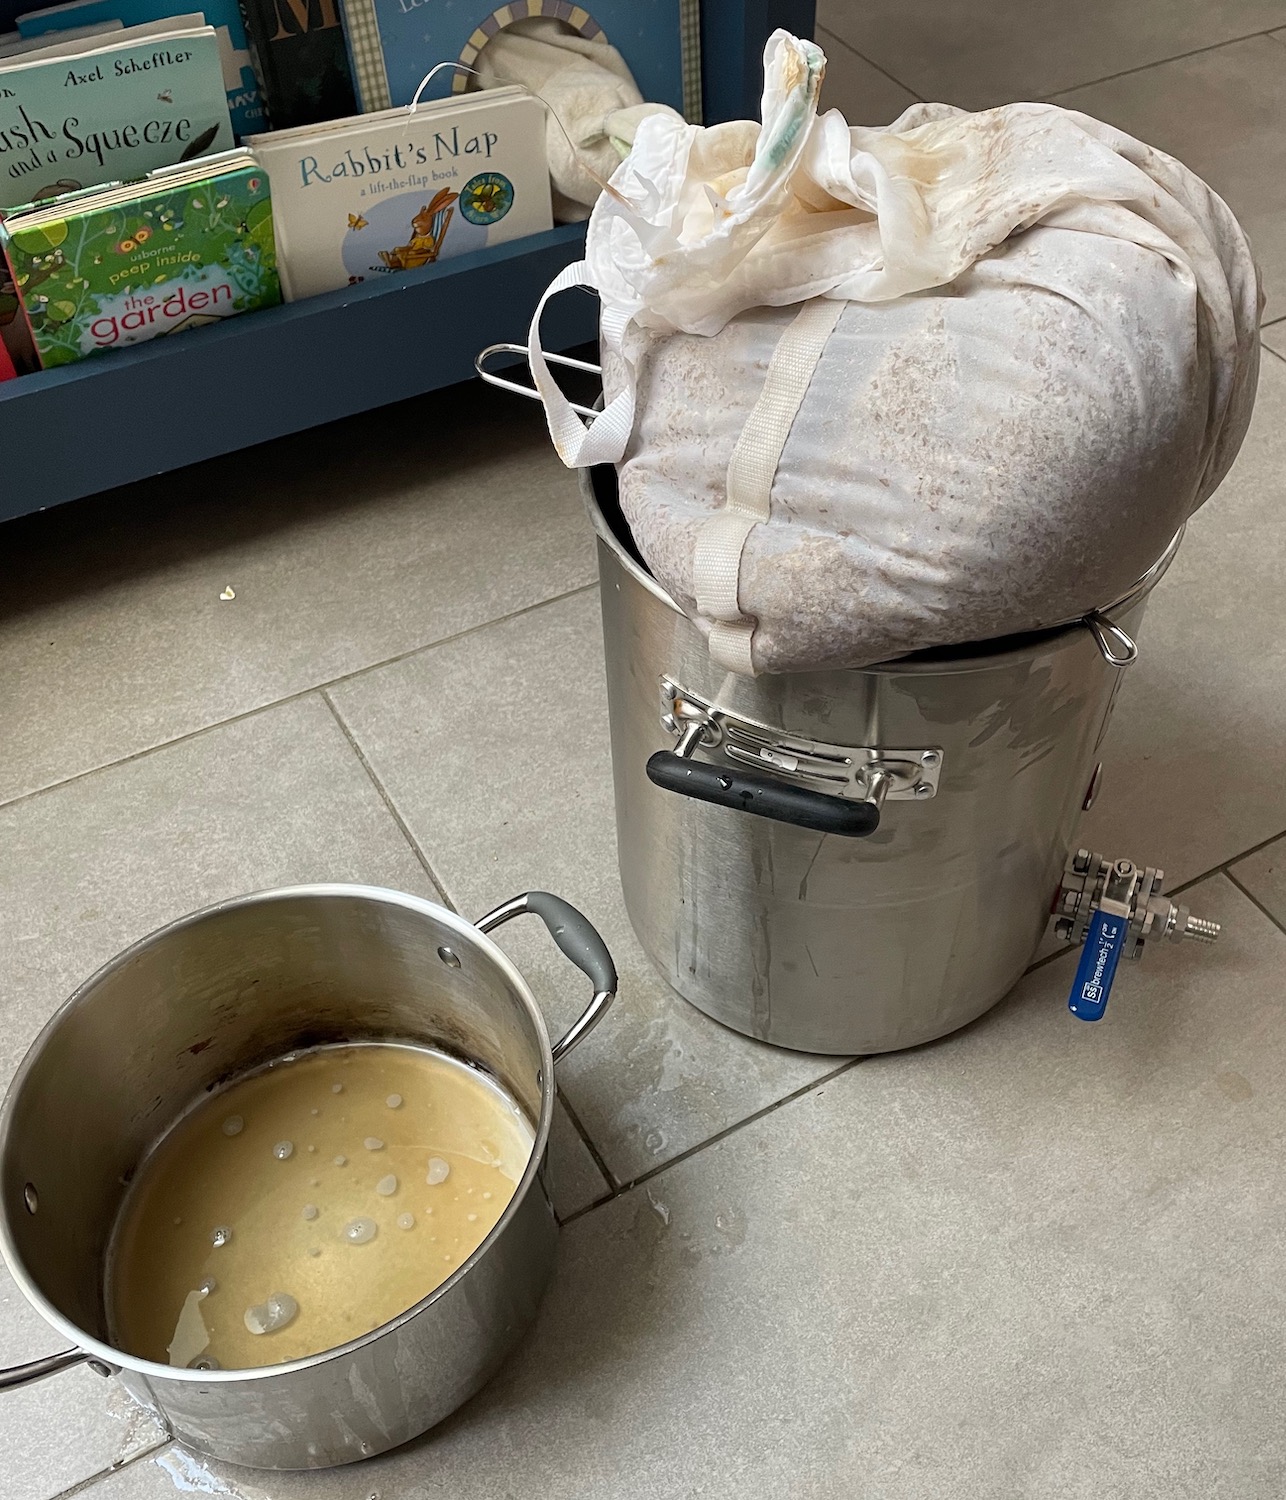
After a fairly hefty squeeze of the bag (to squeeze or not is a very hotly contested topic in homebrew circles) I extracted 14.5 Litres of sweet wort at 1.066 pre-boil gravity! My pre-boil numbers were very close to what my brewing calculator predicted, and had also meant that for my first attempt at mashing ever, I’d managed to hit a mash efficiency of 72%. Very happy with that as the average efficiency for BIAB brewers is about 75% and most places tell you to assume you’ll get 60% when starting out and work from there.
I calculated how much wort was left in the grains and fed those numbers back into my calculator to make the next brew calculations more accurate, and left the brew alone for most of the day.
Part 2: Saturday evening. The Boil
I boil in the kitchen using the powerful wok burner on our gas cooker, so I always wait until the kids are in bed before I boil. I am terrified of the damage that could be inflicted by 15L of boiling sugar water if I mess something up or have an equipment failure.
So I started heating at about 8pm. It took about 30 minutes to come to the boil and get passed the hot break. Once it had, I added my 60 minute bittering addition of 15g Nelson Sauvin hops and started my timer.
Once you’re passed the hot break of the boil there’s not really a lot to do, so I pottered around the kitchen tidying and sorting out some laundry and a few life admin tasks until it was done. Stopping whenever my timer told me to to add the next hop addition or some irish moss (for clarifying the beer).
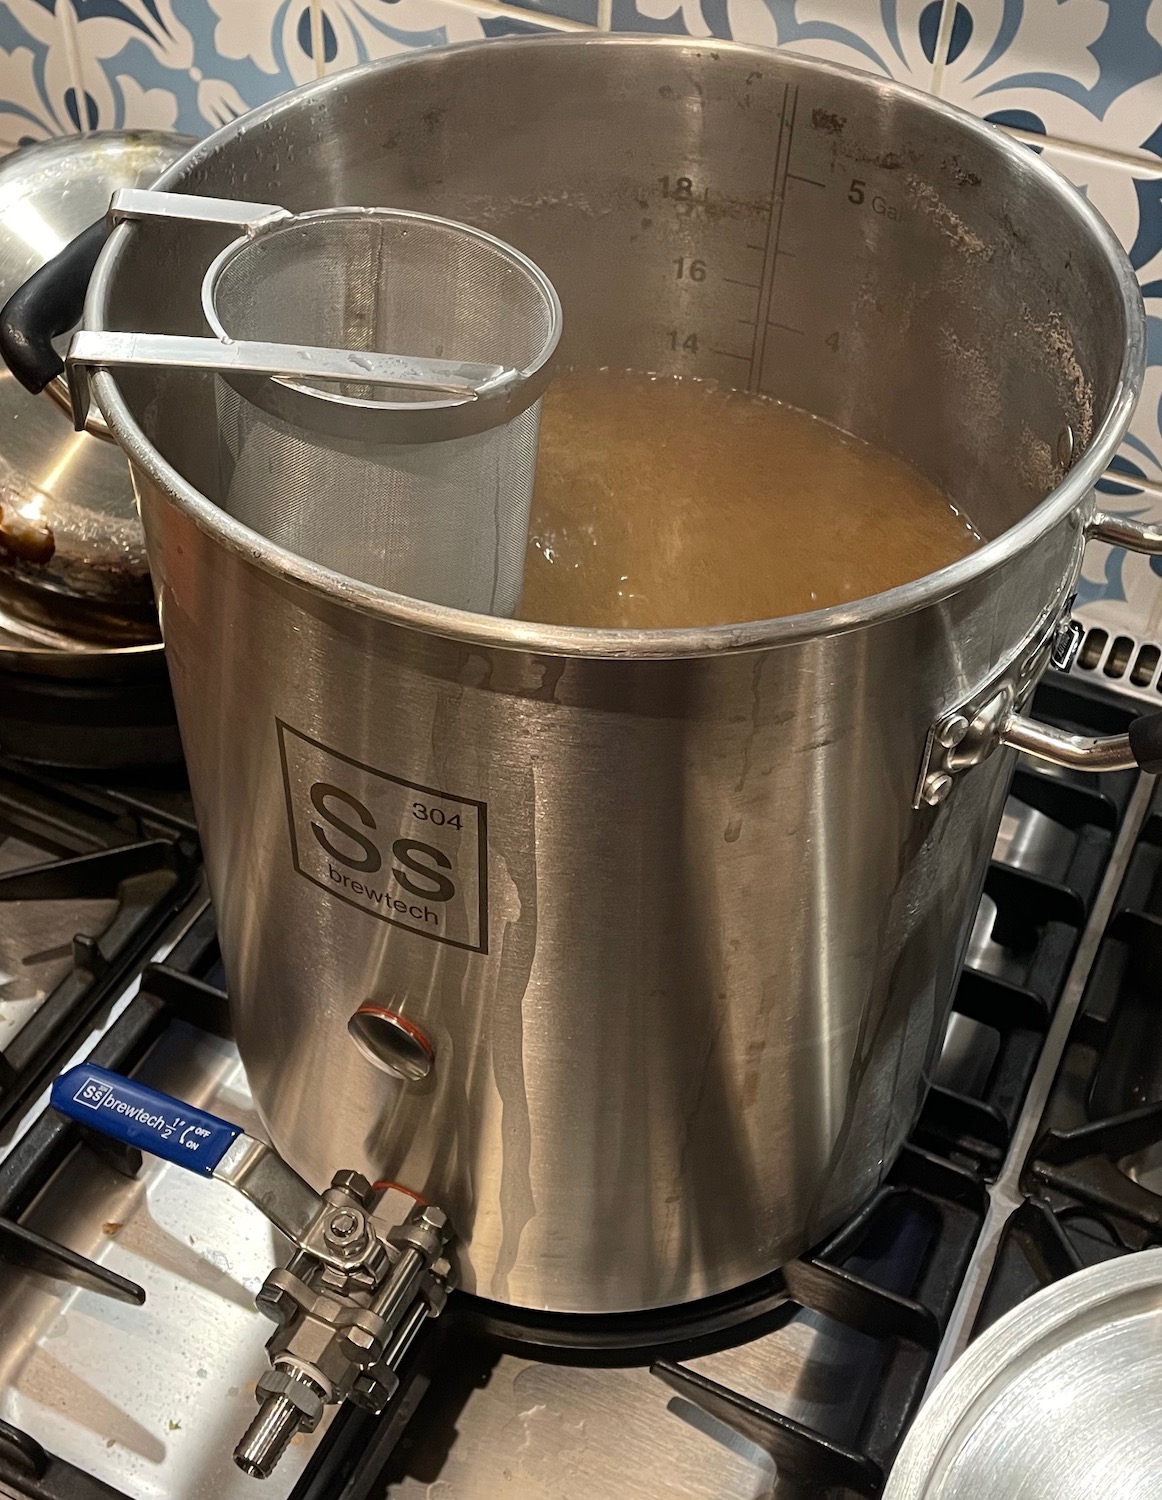
Once the boil was over, I turned off the heat, added my final hop addition and set another timer for 30 minutes. This is called the hop stand, or whirlpool addition and adds more hop character to a beer.
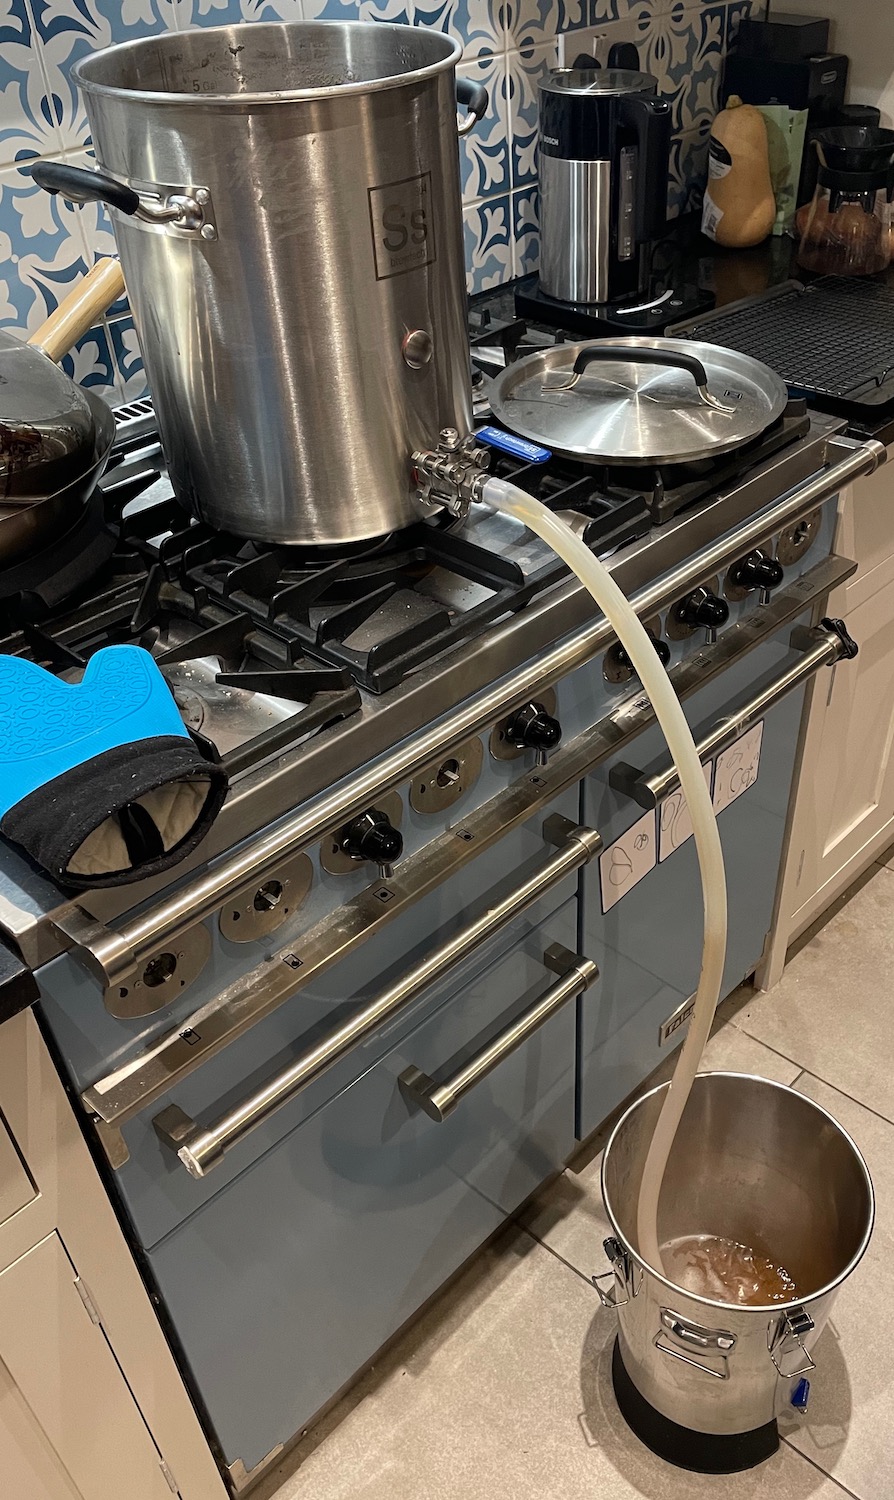
Once the 30 minutes were up I drained the hot wort straight into my fermenter, which I’d already sanitised, and sealed the lid. Now it can sit there and cool down in it’s own time until I’m ready to pitch the yeast. I ended up with almost exactly 11 litres of wort post boil.
Only thing left to do this evening is to clean my equipment, and update my calculations and then I’m done for the day. All grain brewing leaves a lot more trub in the kettle than I’m used to with extract brewing. I measured out how much wort was left in the bottom of the pan, as well as my boil off rate and pushed those numbers into the brewing software I use ready for the next brew, and went to bed.
Part 3: Sunday lunchtime. Pitching
The wort took about 18 hours to come down to tempterature using my very scientific measuring apparatus. I put my hand on the outside of the fermenter and when it felt room temperature then it was probably good to go.
I rehydrated the sached of Safale US-05 according to the instructions in the brewing bible, sprinking the yeast onto 250ml of cooled boiled water and waiting 15 minutes before stirring it in and waiting another 15 minutes.
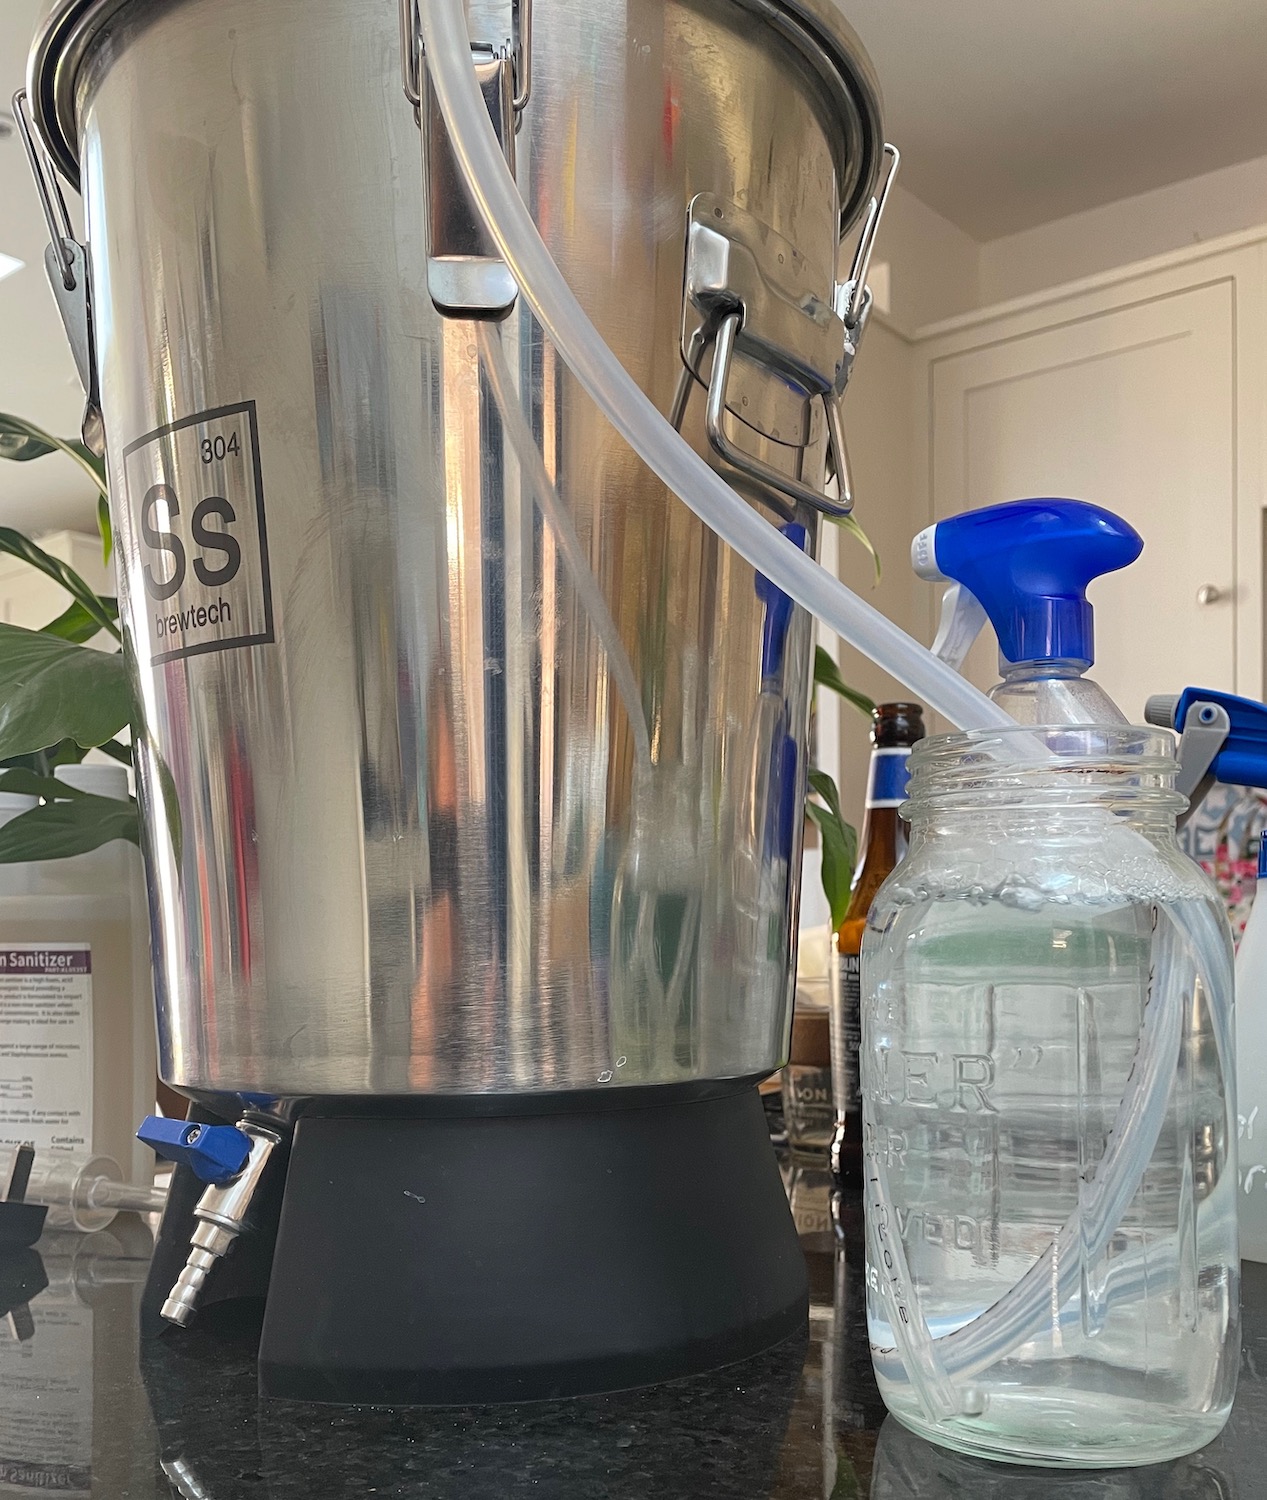
Once my yeast starter was ready I unsealed my fermenter, tipped the yeast straight in, making sure not to touch or let anything fall into the wort. Then I quickly sealed the lid again and attached a blow-off tube with the other end sitting in a kilner jar full of sanitiser.
I normally start my brews off with a blow-off tube for two or three days while the most vigorous fermentation is happening. I’ve been doing this since I filled a fermenter a bit too full once and the first few days of active fermentation caused beer and kräusen to explode through the airlock and pulse out of the fermenter for a while, turning my fermenter into a beer volcano and making a mess of the kitchen.
6 hours later, I came back to find fermentation had started and was running along nicely. And a few hours after that, with bubbles burping regularly from the tube, I sat down with a beer and started writing this.
I will never get bored of this stage! I’ll wait a few days for the fastest bubbles to subside, and then when it’s calmed down a bit I’ll swap the blow off tube for an airlock and put it somewhere out of sight for a couple of weeks. I’ve got some dry-hopping to do when primary fermentation has slowed down, but other than that there’s nothing else to do until it’s time to bottle the beer.
Thanks for reading this far. I’m pretty proud of my first all-grain brew day. I really enjoy the process of brewing my own beer, it’s a very rewarding experience, despite have no idea what’s happening inside the fermenter. For all I know it could all be going horribly wrong and I’ll end up with vinegar, and for all my efforts it’ll go down the drain.
But I can’t tell at the moment, and there’s nothing to do now but wait. So as the denizens of homebrew forums are fond of saying: Relax, don’t worry, have a homebrew. Cheers.
-
As part of the Hymn to Ninkasi, the goddess of beer. The history of women in brewing is fascinating, and depressing. Another example of a field dominated by women, until men decided it was profitable. Support your local women-owned breweries. ↩